Differential Binding detection from ChIP-Seq data
Warning
Read the Background Information before proceeding with these steps
Warning
Read the Project Templates Installation notes to have the cookiecutter available in you shell depending on the execution environment you will be using.
Samples description file
A TSV file named factors.txt is the main file for the projects and workflow. This file should be created before any project creation. It is the base of the workflow and should be copied to the folder data/{{dataset_name}} just after creating the project structure.
The initial sample names, file name prefixes and metadata are specified on it.
It should have the following columns:
id |
SampleID |
condition |
replicate |
|---|---|---|---|
classical01 |
SRR4053795 |
classical |
1 |
classical01 |
SRR4053796 |
classical |
2 |
nonclassical01 |
SRR4053802 |
nonclassical |
1 |
nonclassical01 |
SRR4053803 |
nonclassical |
2 |
Warning
Columns names are required and are case sensitive.
Columns
id: Sample names. It can be different of sample file name.
SampleID: This is the prefix of the sample file name.
For single-end data the prefix ends in the file extension. In this case, for the first column, a file name named SRR4053795.fastq.gz must exist.
For paired-end data the files SRR4053795_1.fastq.gz and SRR4053795_2.fastq.gz must exist.
The data files should be copied to the folder data/{{dataset_name}}/.
condition: Conditions to analyze or group the samples. Avoid using non alphanumeric characters.
For RNASeq projects the differential gene expression will be generated comparing these conditions. If there are multiple conditions all comparisons will be generated. It must be at least two conditions.
For ChIPSeq projects differential binding events will be detected comparing these conditions. If there are multiple conditions all comparisons will be generated. It must be at least two conditions.
For ChIPexo projects the samples of the same condition will be grouped for the peak calling with MACE.
replicate: Replicate number for samples.
Installation
ChIP-Seq workflow with Conda/Bioconda
The ChIP-Seq project structure is created using the conda environment named templates.
First step is to activate the templates environment:
localhost:~> conda activate templates
Then, a YAML file (for this example I will call this file: chipseq-hmgn1.yaml) with your project detail should be created.
1 2 3 4 5 6 7 8 9 10 11 12 13 14 15 16 17 18 19 20 21 22 23 24 25 26 27 28 29 30 31 32 | default_context:
author_name: "Roberto Vera Alvarez"
user_email: "veraalva@ncbi.nlm.nih.gov"
project_name: "chipseq-hmgn1"
dataset_name: "PRJNA481982"
is_data_in_SRA: "y"
ngs_data_type: "ChIP-Seq"
sequencing_technology: "paired-end"
create_demo: "y"
number_spots: "2000000"
organism: "mouse"
genome_dir: "/gfs/data/genomes/igenomes/Homo_sapiens/UCSC/Mus_musculus/mm9"
genome_name: "mm9"
aligner_index_dir: "{{ cookiecutter.genome_dir}}/BWA"
genome_fasta: "{{ cookiecutter.genome_dir}}/genome.fa"
genome_gtf: "{{ cookiecutter.genome_dir}}/genes.gtf"
genome_gff: "{{ cookiecutter.genome_dir}}/genes.gff"
genome_gff3: "{{ cookiecutter.genome_dir}}/genes.gff3"
genome_bed: "{{ cookiecutter.genome_dir}}/genes.bed"
genome_chromsizes: "{{ cookiecutter.genome_dir}}/mm9.chrom.sizes"
genome_mappable_size: "mm9"
genome_blacklist: "{{ cookiecutter.genome_dir}}/mm9-blacklist.bed"
fold_change: "2.0"
fdr: "0.05"
use_docker: "n"
pull_images: "n"
use_conda: "y"
cwl_runner: "cwl-runner"
cwl_workflow_repo: "https://github.com/ncbi/cwl-ngs-workflows-cbb"
create_virtualenv: "n"
use_gnu_parallel: "y"
max_number_threads: "16"
|
A full description of this parameters are here.
After the chipseq-hmgn1.yaml is created the project structure should be created using this command obtaining the following output.
localhost:~> cookiecutter --no-input --config-file chipseq-hmgn1.yaml https://github.com/ncbi/pm4ngs.git
Checking ChIP-Seq workflow dependencies .......... Done
localhost:~>
This process should create a project organizational structure like this:
localhost:~> tree chipseq-hmgn1
chipseq-hmgn1
├── bin
│   ├── bioconda (This directory include a conda envs for all bioinfo tools)
│   ├── cwl-ngs-workflows-cbb (CWL workflow repo cloned here)
│   └── jupyter (This directory include a conda envs for Jupyter notebooks)
├── config
│   └── init.py
├── data
│   └── PRJNA481982
├── doc
├── index.html
├── LICENSE
├── notebooks
│   ├── 00\ -\ Project\ Report.ipynb
│   ├── 01\ -\ Pre-processing\ QC.ipynb
│   ├── 02\ -\ Samples\ trimming.ipynb
│   ├── 03\ -\ Alignments.ipynb
│   └── 04\ -\ Peak\ Calling.ipynb
├── README.md
├── requirements
│   └── python.txt
├── results
│   └── PRJNA481982
├── src
└── tmp

12 directories, 9 files
Now you should copied the factors.txt file to the folder: data/PRJNA481982.
After this process, cookiecutter should have created create two virtual environment for this workflow.
The first one is for running the Jupyter notebooks which require Python 3.6+ and it is named: jupyter. It can be manually installed as described in here.
The second environment is be used to install all Bioinformatics tools required by the workflow and it will be named: bioconda.
You can verify the environments running this command:
localhost:~> conda env list
# conda environments:
#
base                  *  /gfs/conda
tempates                 /gfs/conda/envs/templates
                         /home/veraalva/chipseq-hmgn1/bin/bioconda
                         /home/veraalva/chipseq-hmgn1/bin/jupyter

localhost:~>
Please, note that the Conda prefix /gfs/conda will be different in you host. Also, note that the bioconda and jupyter envs are inside the bin directory of your project keeping them static inside the project organizational structure.
ChIP-Seq workflow usage with Conda/Bioconda
For start using the workflow you need to activate the conda environments bioconda and jupyter.
localhost:~> conda activate /home/veraalva/chipseq-hmgn1/bin/bioconda
localhost:~> conda activate --stack /home/veraalva/chipseq-hmgn1/bin/jupyter
Note the --stack option to have both environment working at the same time. Also, the order is important, bioconda should be activated before jupyter.
Test the conda envs:
localhost:~> which fastqc
/home/veraalva/chipseq-hmgn1/bin/bioconda/bin/fastqc
localhost:~> which jupyter
/home/veraalva/chipseq-hmgn1/bin/jupyter/bin/jupyter
Note that the fastqc tools is installed in the bioconda env and the jupyter command is installed in the jupyter env.
Then, you can start the jupyter notebooks.
localhost:~> jupyter notebook
If the workflow is deployed in a remote machine using SSH access the correct way to start the notebooks is:
localhost:~> jupyter notebook --no-browser --ip='0.0.0.0'
In this case the option --ip='0.0.0.0' will server the Jupyter notebook on all network interfaces and you can access them from your desktop browser using the port returned by the Jupyter server.
Finally, you should navegate in your browser to the notebooks folder and start executing all notebooks by their order leaving the 00 - Project Report.ipynb to the end.
ChIP-Seq workflow with Docker
In this case, the ChIP-Seq project structure is created using the Python virtual environment as described here
First step is to activate the Python virtual environment.
localhost:~> source venv-templates/bin/activate
Then, a YAML file (for this example I will call this file: chipseq-hmgn1.yaml) with your project detail should be created.
1 2 3 4 5 6 7 8 9 10 11 12 13 14 15 16 17 18 19 20 21 22 23 24 25 26 27 28 29 30 31 32 | default_context:
author_name: "Roberto Vera Alvarez"
user_email: "veraalva@ncbi.nlm.nih.gov"
project_name: "chipseq-hmgn1"
dataset_name: "PRJNA481982"
is_data_in_SRA: "y"
ngs_data_type: "ChIP-Seq"
sequencing_technology: "paired-end"
create_demo: "y"
number_spots: "2000000"
organism: "mouse"
genome_dir: "/gfs/data/genomes/igenomes/Homo_sapiens/UCSC/Mus_musculus/mm9"
genome_name: "mm9"
aligner_index_dir: "{{ cookiecutter.genome_dir}}/BWA"
genome_fasta: "{{ cookiecutter.genome_dir}}/genome.fa"
genome_gtf: "{{ cookiecutter.genome_dir}}/genes.gtf"
genome_gff: "{{ cookiecutter.genome_dir}}/genes.gff"
genome_gff3: "{{ cookiecutter.genome_dir}}/genes.gff3"
genome_bed: "{{ cookiecutter.genome_dir}}/genes.bed"
genome_chromsizes: "{{ cookiecutter.genome_dir}}/mm9.chrom.sizes"
genome_mappable_size: "mm9"
genome_blacklist: "{{ cookiecutter.genome_dir}}/mm9-blacklist.bed"
fold_change: "2.0"
fdr: "0.05"
use_docker: "y"
pull_images: "y"
use_conda: "n"
cwl_runner: "cwl-runner"
cwl_workflow_repo: "https://github.com/ncbi/cwl-ngs-workflows-cbb"
create_virtualenv: "y"
use_gnu_parallel: "y"
max_number_threads: "16"
|
A full description of this parameters are here.
After the chipseq-hmgn1.yaml is created the project structure should be created using this command obtaining the following output.
localhost:~>  cookiecutter --no-input --config-file chipseq-paired.yaml https://github.com/ncbi/pm4ngs.git
Cloning Git repo: https://github.com/ncbi/cwl-ngs-workflows-cbb to /home/veraalva/chipseq-hmgn1/bin/cwl-ngs-workflows-cbb
Creating a Python3.7 virtualenv
Installing packages in: /home/veraalva/chipseq-hmgn1/venv using file /home/veraalva/chipseq-hmgn1/requirements/python.txt
Checking ChIP-Seq workflow dependencies .
        Pulling image: quay.io/biocontainers/fastqc:0.11.8--1 . Done .
        Pulling image: quay.io/biocontainers/trimmomatic:0.39--1 . Done .
        Pulling image: quay.io/biocontainers/bwa:0.7.17--h84994c4_5 . Done .
        Pulling image: quay.io/biocontainers/bedtools:2.28.0--hdf88d34_0 . Done .
        Pulling image: quay.io/biocontainers/bcftools:1.9--h5c2b69b_5 . Done .
        Pulling image: quay.io/biocontainers/phantompeakqualtools:1.2--1 . Done .
        Pulling image: quay.io/biocontainers/samtools:1.9--h91753b0_8 . Done .
        Pulling image: quay.io/biocontainers/rseqc:3.0.0--py_3 . Done .
        Pulling image: quay.io/biocontainers/sra-tools:2.9.6--hf484d3e_0 . Done .
        Pulling image: quay.io/biocontainers/igvtools:2.5.3--0 . Done .
        Pulling image: quay.io/biocontainers/macs2:2.1.2--py27r351h14c3975_1 . Done .
        Pulling image: quay.io/biocontainers/homer:4.10--pl526hc9558a2_0 . Done .
        Pulling image: ubuntu:18.04 . Done
        Building image: r-3.5_ubuntu-18.04 . Done  Done
localhost:~>
This process should create a project organizational structure like this:
localhost:~> tree chipseq-hmgn1
chipseq-hmgn1
.
├── bin
│   └── cwl-ngs-workflows-cbb (CWL workflow repo cloned here)
├── config
│   └── init.py
├── data
│   └── PRJNA481982
├── doc
├── index.html
├── LICENSE
├── notebooks
│   ├── 00 - Project Report.ipynb
│   ├── 01 - Pre-processing QC.ipynb
│   ├── 02 - Samples trimming.ipynb
│   ├── 03 - Alignments.ipynb
│   └── 04 - Peak Calling.ipynb
├── README.md
├── requirements
│   └── python.txt
├── results
│   └── PRJNA481982
├── src
├── tmp
└── venv
    ├── bin
    ├── etc
    ├── include
    ├── lib
    ├── lib64 -> lib
    ├── LICENSE.txt
    ├── locale
    ├── README.md
    ├── README.rst
    ├── setup.cfg
    └── share

20 directories, 14 files
Now you should copied the factors.txt file to the directory: data/PRJNA481982.
After this process, cookiecutter should have pulled all docker images require by the project.
ChIP-Seq workflow usage with Docker
For start using the workflow you need to activate the Python environment inside the project.
localhost:~> source venv/bin/activate
Then, you can start the jupyter notebooks now.
localhost:~> jupyter notebook
If the workflow is deployed in a remote machine using SSH access the correct way to start the notebooks is:
localhost:~> jupyter notebook --no-browser --ip='0.0.0.0'
In this case the option --ip='0.0.0.0' will server the Jupyter notebook on all network interfaces and you can access them from your desktop browser using the port returned by the Jupyter server.
Finally, you should navigate in your browser to the notebooks directory and start executing all notebooks by their order leaving the 00 - Project Report.ipynb to the end.
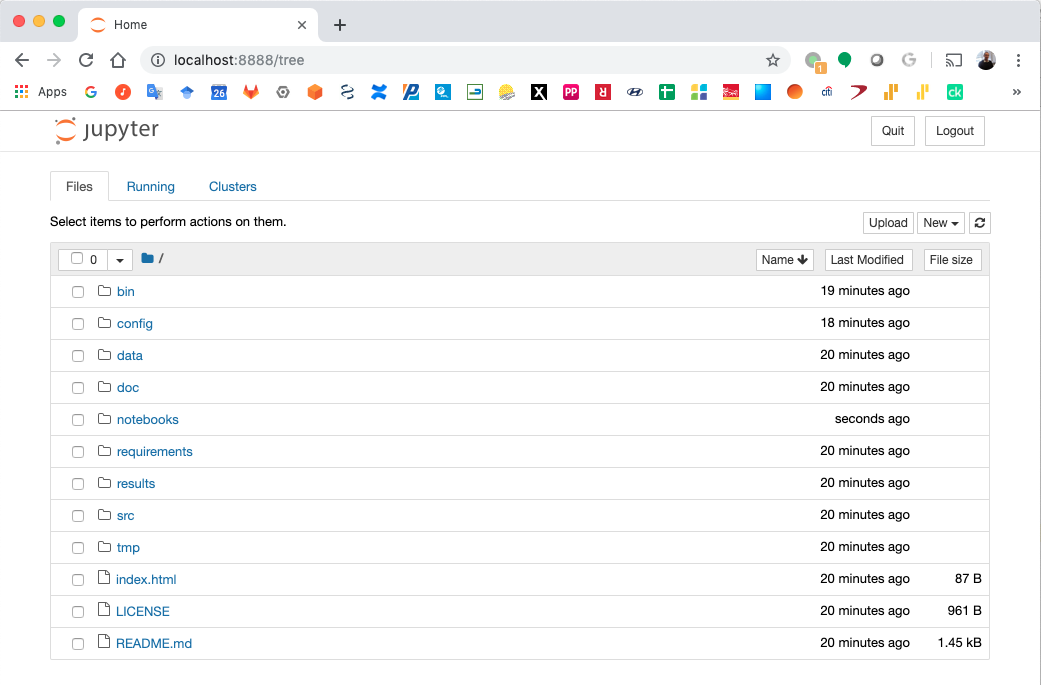
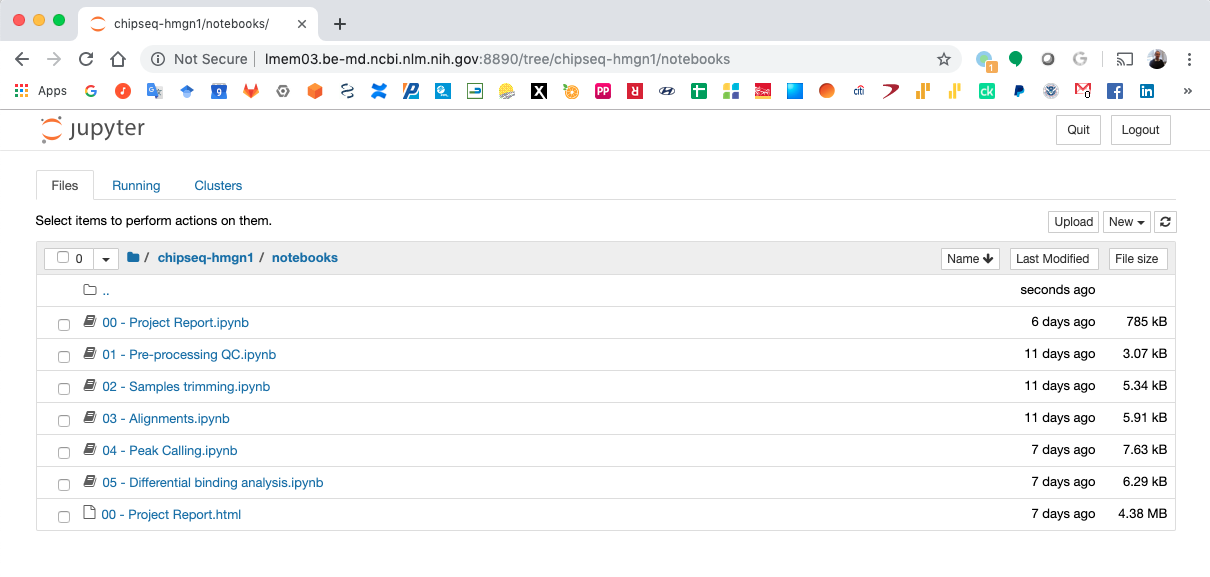
Jupyter Notebook Server
Top-level directories from the Jupyter server viewed in a web browser
Notebook generated fro the ChIP-Seq data analysis
CWL workflows
SRA download and QC workflow
This CWL workflow is designed to download FASTQ files from the NCBI SRA database using fastq-dump and then, execute fastqc generating a quality control report of the sample.
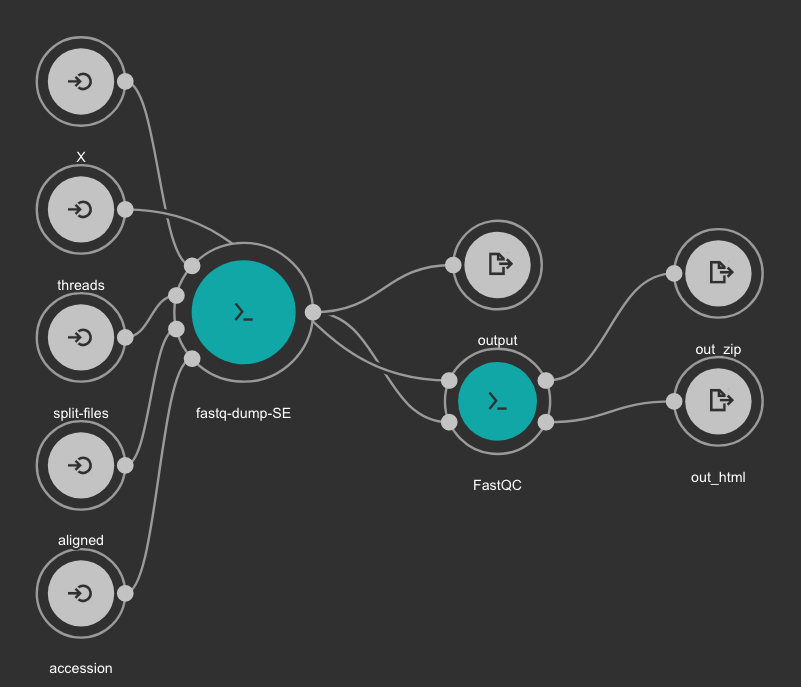
Inputs
accession: SRA accession ID. Type: string. Required.
aligned: Used it to download only aligned reads. Type: boolean. Optional.
split-files: Dump each read into separate file. Files will receive suffix corresponding to read number. Type: boolean. Optional.
threads: Number of threads. Type: int. Default: 1. Optional.
X: Maximum spot id. Optional.
Outputs
output: Fastq files downloaded. Type: File[]
out_zip: FastQC report ZIP file. Type: File[]
out_html: FastQC report HTML. Type: File[]
Samples Trimming
Our workflows uses Trimmomatic for read trimming. The Jupyter notebooks uses some basic Trimmomatic options that need to be modified depending on the FastQC quality control report generated for the sample.
BWA based alignment and quality control workflow
This workflow use BWA as base aligner. It also use SAMtools and bedtools for file conversion and statistics report. Finally, Phantompeakqualtools is used to generate quality control report for the processed samples.
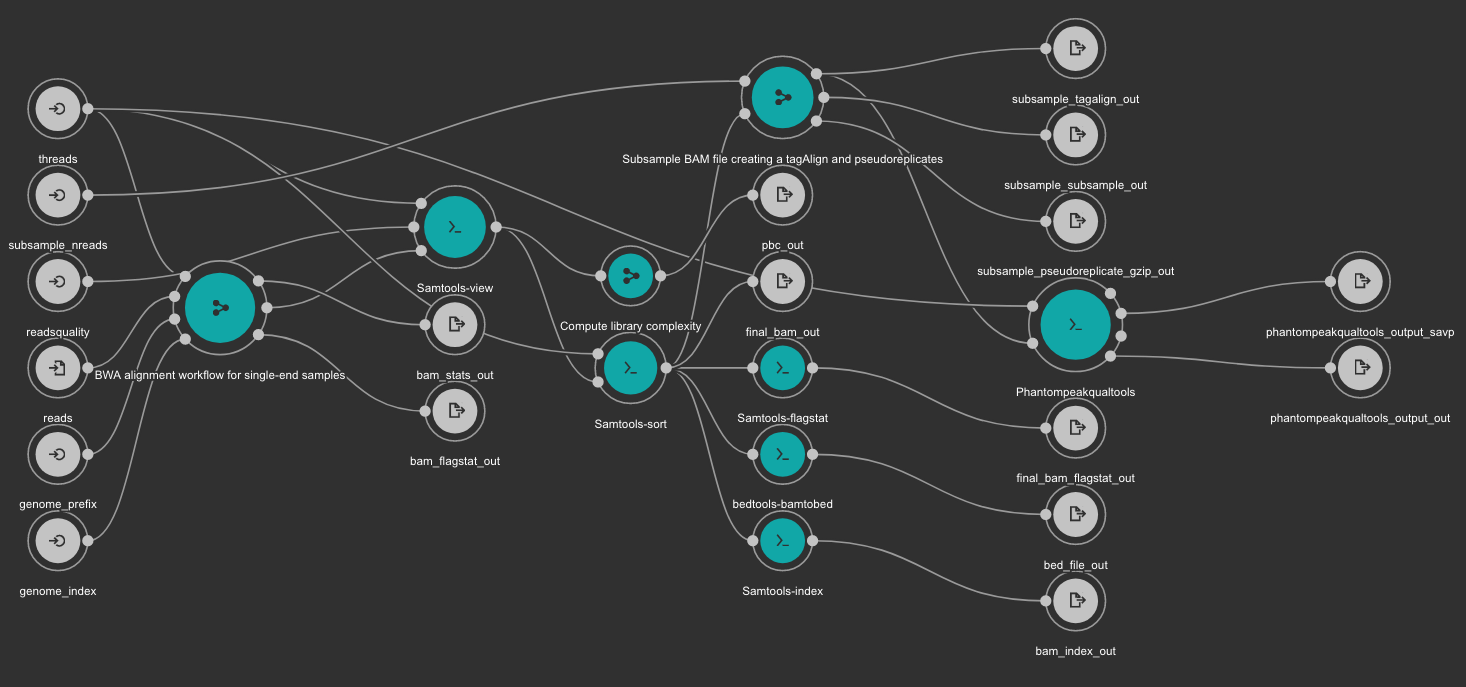
Inputs
genome_index: Aligner indexes directory. Type: Directory. Required. Variable ALIGNER_INDEX in the Jupyter Notebooks.
genome_prefix: Prefix of the aligner indexes. Generally, it is the name of the genome FASTA file. It can be used as os.path.basename(GENOME_FASTA) in the Jupyter Notebooks. Type: string. Required.
readsquality: Minimum MAPQ value to use reads. We recommend for ChIP_exo dataa value of: 30. Type: int. Required.
threads: Number of threads. Type: int. Default: 1. Optional.
subsample_nreads: Number of reads to be used for the subsample. We recomend for ChIP_exo dataa value of: 500000. Type: int. Required.
reads: FastQ file to be processed. Type: File. Required.
Outputs
bam_flagstat_out: SAMtools flagstats for unfiltered BAM file. Type: File.
bam_stats_out: SAMtools stats for unfiltered BAM file. Type: File.
final_bam_flagstat_out: SAMtools flagstats for filtered BAM file. Type: File.
bed_file_out:: Aligned reads in BED format. Type: File.
final_bam_out: Final BAM file filtered and sorted. Type: File.
bam_index_out: BAM index file. Type: File.
pbc_out: Library complexity report. Type: File.
phantompeakqualtools_output_out: Phantompeakqualtools main output. Type: File.
phantompeakqualtools_output_savp: Phantompeakqualtools SAVP output. Type: File.
subsample_pseudoreplicate_gzip_out: Subsample pseudoreplicates tagAlign gzipped. Type: File[].
subsample_tagalign_out: Subsample tagAlign gzipped. Type: File[].
subsample_subsample_out: Subsample shuffled tagAlign gzipped. Type: File[].
Peak caller workflow using MACS2
This workflow uses MACS2 as peak caller tool. The annotation is created using Homer and TDF files are created with igvtools.
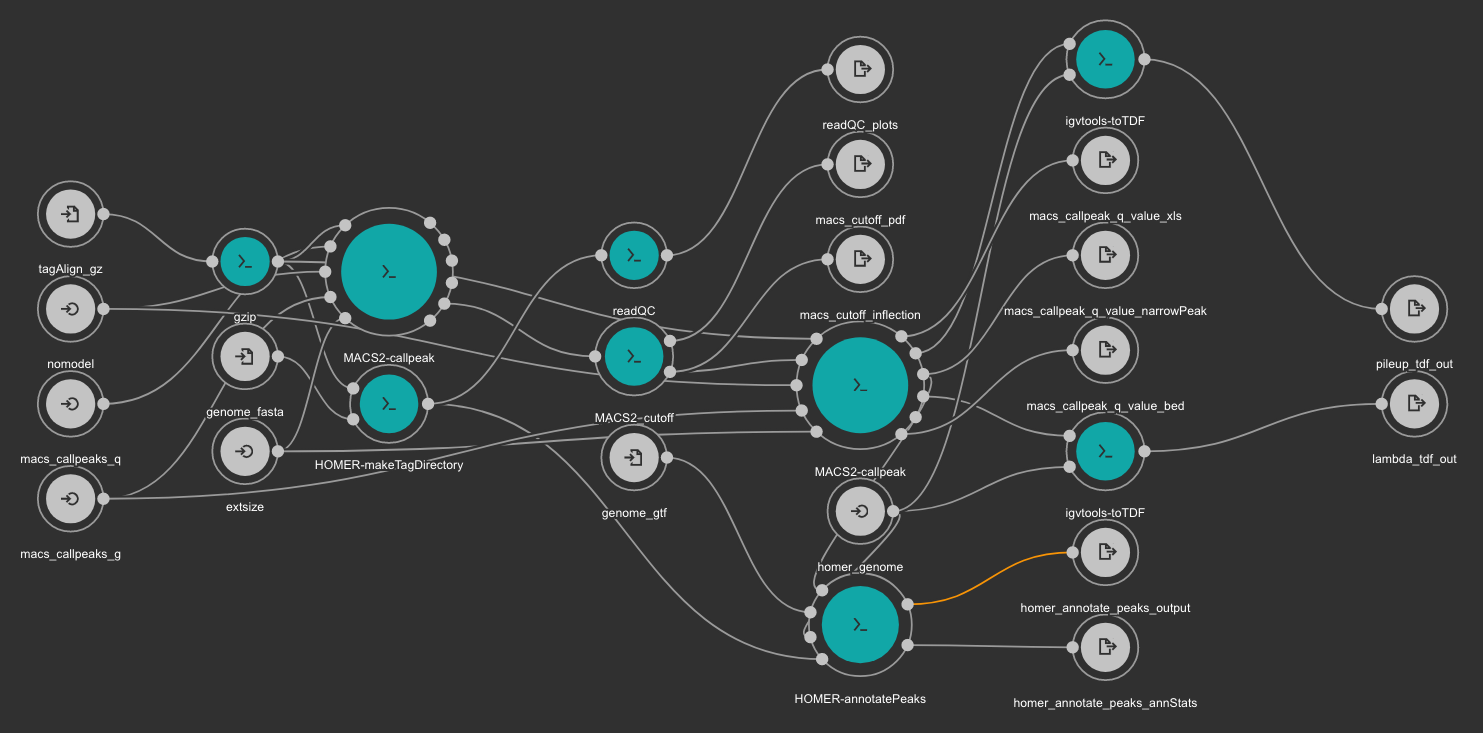
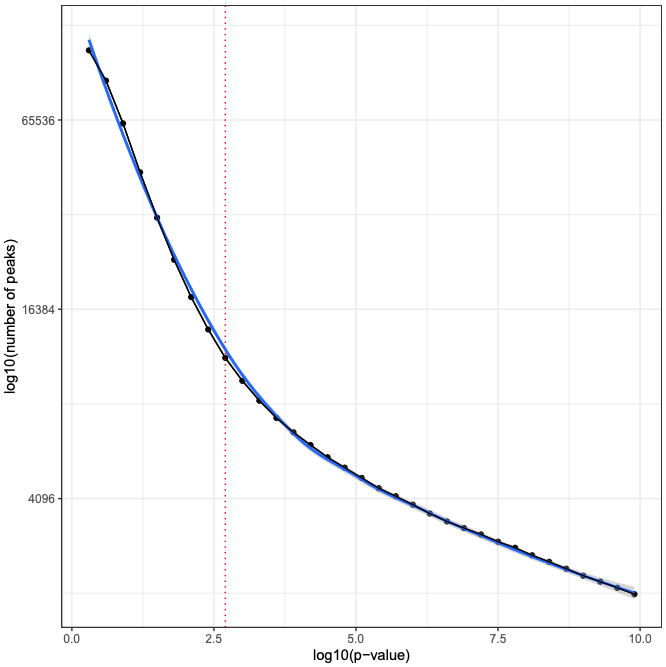
MACS2 is executed two times. First, the cutoff-analysis option is used to execute a cutoff value analysis which is used to estimate a proper value for the p-value used by MACS2 (for more detailed explanation read this thread).
RSeQC is also executed for quality control.
Inputs
homer_genome: Homer genome name. Type: string. Required.
genome_fasta Genome FASTA file. Type: File. Required. Variable GENOME_FASTA in the Jupyter Notebooks.
genome_gtf: Genome GTF file. Type: File. Required. Variable GENOME_GTF in the Jupyter Notebooks.
tagAlign_gz: Tag aligned file created with the BWA based alignment and quality control workflow. Type: File. Required.
macs_callpeaks_g: Genome mapeable size as defined in MACS2. Type: string. Required. Variable GENOME_MAPPABLE_SIZE in the Jupyter Notebooks.
macs_callpeaks_q: MACS2 q option. Starting qvalue (minimum FDR) cutoff to call significant regions. Type: float. Required. Variable fdr in the Jupyter Notebooks.
nomodel: MACS2 nomodel option. MACS will bypass building the shifting model. Type: boolean. Optional.
extsize: MACS2 extsize option. MACS uses this parameter to extend reads in 5'->3' direction to fix-sized fragments. Type: int. Optional.
Outputs
readQC_plots: RSeQC plots. Type: File[]
macs_cutoff_pdf MACS2 cutoff analysis plot in PDF format. Type: File
macs_cutoff_inflection: MACS2 inflection q value used for the second round. Type: File
macs_callpeak_q_value_narrowPeak: Final MACS2 narrowpeak file. Type: File
macs_callpeak_q_value_xls: Final MACS2 XLS file. Type: File
macs_callpeak_q_value_bed: Final MACS2 BED file. Type: File
homer_annotate_peaks_output: Homer annotated BED file. Type: File
homer_annotate_peaks_annStats: Homer annotation statistics. Type: File
lambda_tdf_out: MACS2 lambda file in TDF format. Type: File
pileup_tdf_out: MACS2 pileup file in TDF format. Type: File
Differential binding analysis with Diffbind
Differential binding event is detected with Diffbind. Thsi tool will be executed for all comparisons added to the comparisons array. See cell number 3 in the notebook 05 - Differential binding analysis.ipynb (ChIP-Seq workflow).
Inputs
bamDir: Directory with the BAM files. Type: Directory. Required.
bedDir: Directory with BED files created from MACS2 peak calling workflow Type: Directory. Required.
Outputs
outpng: PNG files created from Diffbind. Type File[]
outxls: XLS files created from Diffbind. Type: File[]
outbed BED files created from Diffbind. Type: File[]
Test Project
A test project is available (read-only) at https://ftp.ncbi.nlm.nih.gov/pub/pm4ngs/examples/chipseq-hmgn1
Extra requirements
Configuring Homer databases
Homer needs organism, promoter and genome databases for the annotation process. These databases are not distributed with the default installation package.
The users need to install the specific databases for the organism analyzed in their projects. The next example is for mouse.
Using Conda
localhost:~> conda activate /home/veraalva/chipseq-hmgn1/bin/bioconda
localhost:~> perl /home/veraalva/chipseq-hmgn1/bin/bioconda/share/homer-4.10-0/configureHomer.pl -install mouse-o mouse-p mm9
localhost:~> perl /home/veraalva/chipseq-hmgn1/bin/bioconda/share/homer-4.10-0/configureHomer.pl -list | grep -v "^-"

    Current base directory for HOMER is /home/veraalva/chipseq-hmgn1/bin/bioconda/share/homer-4.10-0/

--2019-08-30 12:05:27--  http://homer.ucsd.edu/homer/update.txt
Resolving homer.ucsd.edu (homer.ucsd.edu)... 169.228.63.226
Connecting to homer.ucsd.edu (homer.ucsd.edu)|169.228.63.226|:80... connected.
HTTP request sent, awaiting response... 200 OK
Length: 16187 (16K) [text/plain]
Saving to: ‘/home/veraalva/chipseq-hmgn1/bin/bioconda/share/homer-4.10-0//update.txt’

/gfs/projects/ngs_templates/cookiecutter/chips 100%[===================================================================================================>]  15.81K  --.-KB/s    in 0.07s

2019-08-30 12:05:28 (211 KB/s) - ‘/home/veraalva/chipseq-hmgn1/bin/bioconda/share/homer-4.10-0//update.txt’ saved [16187/16187]

    Updating Settings...
Packages with name conflicts have a trailing -o, -p, or -g
Version Installed   Package Version Description
SOFTWARE
+   homer   v4.10.4 Code/Executables, ontologies, motifs for HOMER
ORGANISMS
+   mouse-o v6.0    Mus musculus (mouse) accession and ontology information
PROMOTERS
+   mouse-p v5.5    mouse promoters (mouse)
GENOMES
+   mm9     v6.0    mouse genome and annotation for UCSC mm9
SETTINGS
Using Docker
A directory named data/homer will be used to store all homer configuration and databases.
localhost:~> cd chipseq-hmgn1/data
localhost:~> mkdir -p homer
localhost:~> docker run -u `id -u`:`id -g` -i -t -v `pwd`/homer:/data quay.io/biocontainers/homer:4.10--pl526hc9558a2_0 cp /usr/local/share/homer-4.10-0/config.txt /data/
localhost:~> docker run -u `id -u`:`id -g` -i -t -v `pwd`/homer:/data quay.io/biocontainers/homer:4.10--pl526hc9558a2_0 cp /usr/local/share/homer-4.10-0/update.txt /data/
localhost:~> docker run -u `id -u`:`id -g` -i -t -v `pwd`/homer:/data quay.io/biocontainers/homer:4.10--pl526hc9558a2_0 cp -rf /usr/local/share/homer-4.10-0/data /data/
localhost:~> docker run -i -t -v `pwd`/homer/config.txt:/usr/local/share/homer-4.10-0/config.txt -v `pwd`/homer/update.txt:/usr/local/share/homer-4.10-0/update.txt -v `pwd`/homer/data:/usr/local/share/homer-4.10-0/data  quay.io/biocontainers/homer:4.10--pl526hc9558a2_0 perl /usr/local/share/homer-4.10-0/configureHomer.pl -install mouse-o mouse-p mm9
localhost:~> docker run -i -t -v `pwd`/homer/config.txt:/usr/local/share/homer-4.10-0/config.txt -v `pwd`/homer/update.txt:/usr/local/share/homer-4.10-0/update.txt -v `pwd`/homer/data:/usr/local/share/homer-4.10-0/data  quay.io/biocontainers/homer:4.10--pl526hc9558a2_0 perl /usr/local/share/homer-4.10-0/configureHomer.pl -list | grep -v "^-"

    Current base directory for HOMER is /usr/local/share/homer-4.10-0/

Connecting to homer.ucsd.edu (169.228.63.226:80)
update.txt           100% |*******************************| 16187   0:00:00 ETA
    Updating Settings...
Packages with name conflicts have a trailing -o, -p, or -g
Version Installed   Package Version Description
SOFTWARE
+   homer   v4.10.4 Code/Executables, ontologies, motifs for HOMER
ORGANISMS
+   mouse-o v6.0    Mus musculus (mouse) accession and ontology information
PROMOTERS
+   mouse-p v5.5    mouse promoters (mouse)
GENOMES
+   mm9     v6.0    mouse genome and annotation for UCSC mm9
SETTINGS