9. Transcriptome Annotation pipeline for non-model organisms
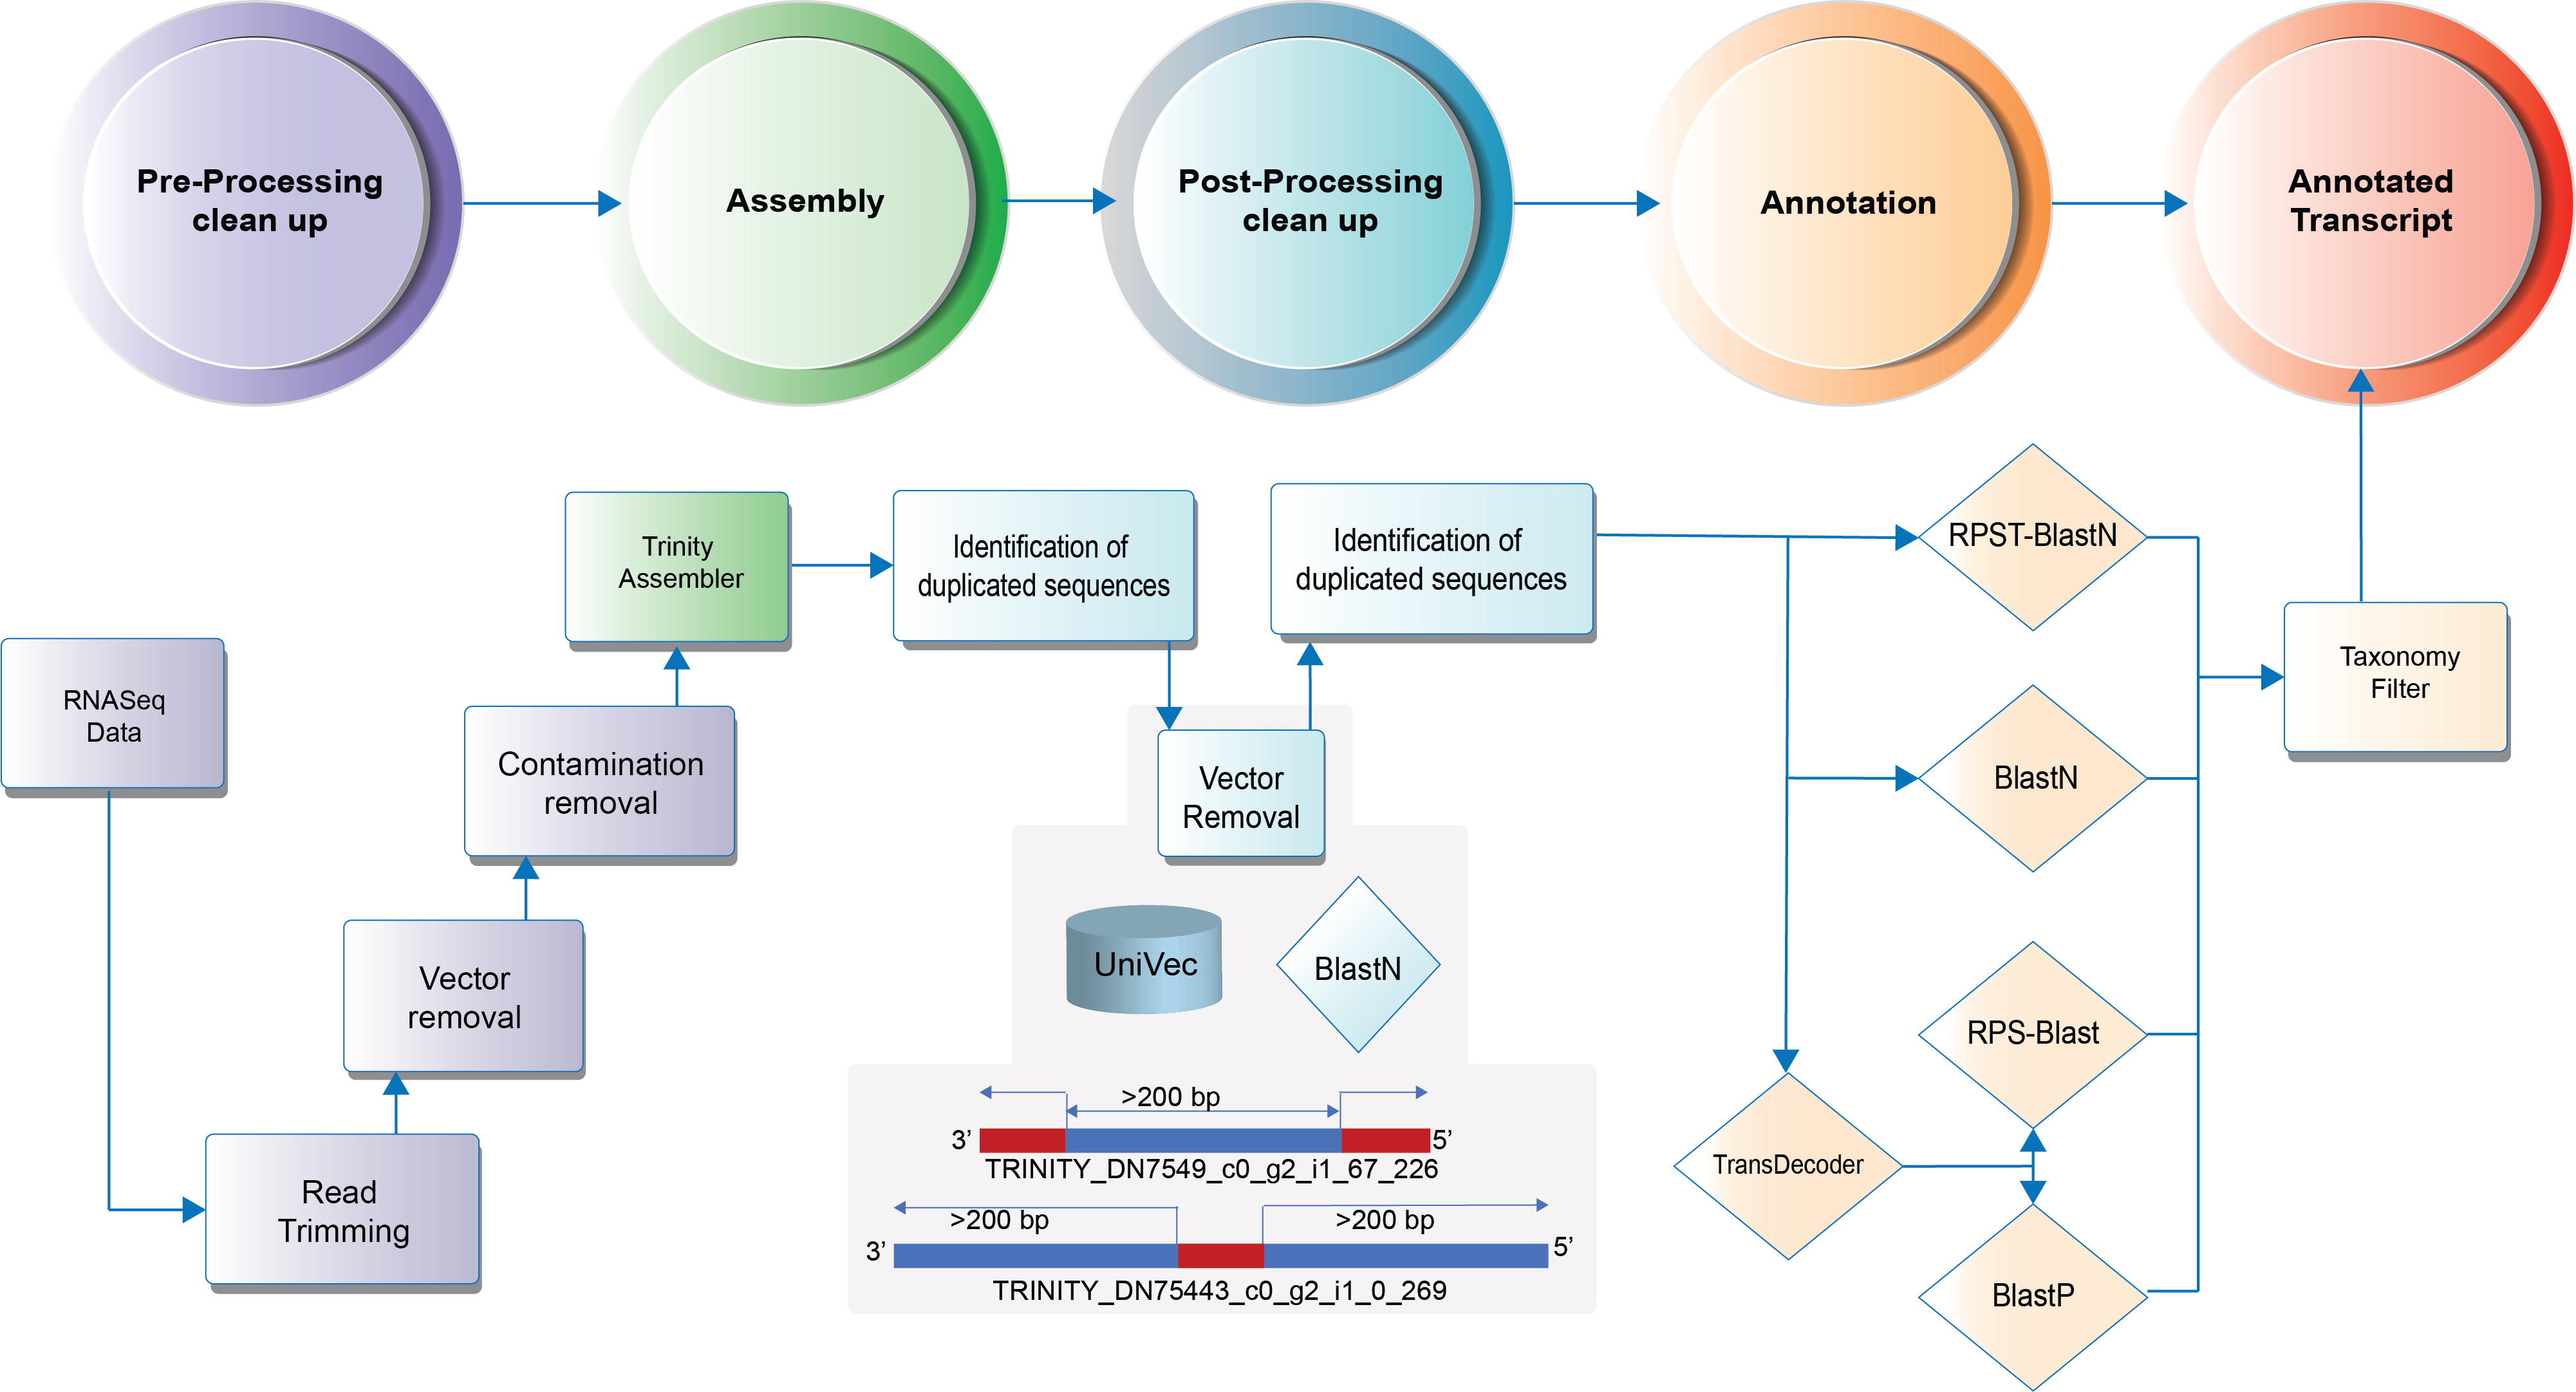
9.1. Annotation Workflow
Attention
This annotation pipeline uses Google Cloud platform for all computing tasks. Users should have installed and configured Cloud SDK.
9.2. GCP configuration
Cloud SDK should be installed and configured. The pipelines are based on the Cloud Life Sciences (beta) API.
To install the beta commands use this command line:
localhost:~> gcloud components install beta
kubectl command is also required. This is used by Elastic-blast to configure the Kubernetes cluster on GCP.
It can be installed:
localhost:~> gcloud components install kubectl
9.3. Input requirements
The input requirement for this pipeline is the Sample sheet file.
9.4. Pipeline command line
The annotation project can be created using the following command line:
localhost:~> pm4ngs-transcriptome-annotation
usage: Generate a PM4NGS project for Transcriptome-Annotation data analysis [-h] [-v]
                                --sample-sheet SAMPLE_SHEET [--config-file CONFIG_FILE] [--copy-rawdata]

Generate a PM4NGS project for Transcriptome-Annotation data analysis:
error: the following arguments are required: --sample-sheet
Options:
- sample-sheet: Sample sheet with the samples SRA run IDs in the first column
- config-file: YAML file with configuration for project creation
- copy-rawdata: Copy the raw data defined in the sample sheet to the project structure. (The data can be hosted locally or in an http server)
9.5. Creating the annotation project
The pm4ngs-transcriptome-annotation command line executed with the --sample-sheet option will let you type the different variables required for creating and configuring the project. The default value for each variable is shown in the brackets.
localhost:~> pm4ngs-transcriptome-annotation --sample-sheet my-sample-sheet.tsv
Generating Transcriptome-Annotation data analysis project
author_name [Roberto Vera Alvarez]:
email [veraalva@ncbi.nlm.nih.gov]:
project_name [my_ngs_project]: nopal-annotation
dataset_name [my_dataset_name]: PRJNA320545
Select sequencing_technology:
1 - single-end
2 - paired-end
Choose from 1, 2 [1]: 1
Copying file /home/veraalva/my-sample-sheet.tsv  to /home/veraalva/nopal-annotation/data/PRJNA320545/sample_table.csv
 Done
The pm4ngs-rnaseq command line will create a project structure as:
.
├── LICENSE
├── README.md
├── bin
│   └── gcp
│       ├── pipeline-blastn.json
│       ├── pipeline-contamination-cleanup.json
│       ├── pipeline-download-sra.json
│       ├── pipeline-read-assignment.json
│       ├── pipeline-split-fasta.json
│       ├── pipeline-transcriptome-annotation-rpsblast.json
│       ├── pipeline-transcriptome-annotation-rpstblastn.json
│       ├── pipeline-transcriptome-annotation.json
│       ├── pipeline-transcriptome-cleanup.json
│       ├── pipeline-transcriptome-fastq-cleanup.json
│       ├── pipeline-trimming-fastq-pe.json
│       ├── pipeline-trimming-fastq-se.json
│       └── pipeline-trinity.json
├── config
│   └── init.py
├── data
│   └── PRJNA320545
│       └── sample_table.csv
├── doc
├── notebooks
│   ├── 01 - Download and pre-processing quality control.ipynb
│   ├── 02 - Sample Trimming.ipynb
│   ├── 03 - Vector removal.ipynb
│   ├── 04 - Detecting Contamination.ipynb
│   ├── 05 - Trinity assembly.ipynb
│   ├── 06 - Vector Detection and data Partitioning.ipynb
│   ├── 07 - Transcriptome annotation.ipynb
│   ├── 08 - Transcript Annotation - Blast.ipynb
│   ├── 09 - Transcript Annotation - CDD.ipynb
│   ├── 10 - Transcript Submission to TSA.ipynb
│   ├── 11 - Alignment of raw read to the transcriptome.ipynb
│   └── 12 - Quantifying transcripts.ipynb
├── requirements
│   └── conda-env-dependencies.yaml
├── results
│   └── PRJNA320545
├── src
└── tmp

12 directories, 29 files
Note
RNASeq based project variables
- author_name:
Default: [Roberto Vera Alvarez]
- email:
Default: [veraalva@ncbi.nlm.nih.gov]
- project_name:
Name of the project with no space nor especial characters. This will be used as project folder's name.
Default: [my_ngs_project]
- dataset_name:
Dataset to process name with no space nor especial characters. This will be used as folder name to group the data. This folder will be created under the data/{{dataset_name}} and results/{{dataset_name}}.
Default: [my_dataset_name]
- Select sequencing_technology:
Select one of the available sequencing technologies in your data.
Values: 1 - single-end, 2 - paired-end
9.6. Jupyter server
PM4NGS uses Jupyter as interface for users. After project creation the jupyter server should be started as shown below. The server will open a browser windows showing the project's structure just created.
localhost:~> jupyter notebook
9.7. Data processing
Start executing the notebooks from 01 to 12 waiting for each step completion.
9.8. Demo
PM4NGS includes a demo project that users can use to test the framework. It is pre-configured to use Docker as execution environment.
The annotated based demo process samples from the BioProject PRJNA320545.
Use this command to create the project structure in your local computer
localhost:~> pm4ngs-transcriptome-annotation-demo
Once it finish, start the jupyter server and execute the notebooks as it is indicated on them
localhost:~> jupyter notebook
[I 14:12:52.956 NotebookApp] Serving notebooks from local directory: /home/veraalva
[I 14:12:52.956 NotebookApp] Jupyter Notebook 6.1.4 is running at:
[I 14:12:52.956 NotebookApp] http://localhost:8888/?token=eae6a8d42ad12d6ace23f5d0923bcec14d0f798127750122
[I 14:12:52.956 NotebookApp]  or http://127.0.0.1:8888/?token=eae6a8d42ad12d6ace23f5d0923bcec14d0f798127750122
[I 14:12:52.956 NotebookApp] Use Control-C to stop this server and shut down all kernels (twice to skip confirmatio
n).
[C 14:12:52.959 NotebookApp]

    To access the notebook, open this file in a browser:
        file:///home/veraalva/.local/share/jupyter/runtime/nbserver-23251-open.html
    Or copy and paste one of these URLs:
        http://localhost:8888/?token=eae6a8d42ad12d6ace23f5d0923bcec14d0f798127750122
     or http://127.0.0.1:8888/?token=eae6a8d42ad12d6ace23f5d0923bcec14d0f798127750122